OneDrive - Workstation Synchronization

In this (Macintosh-based) guide, we outline how to set up a cloud-based working environment with Microsoft OneDrive. Learn how to install apps, synchronize files, stay organized, and improve efficiency with shortcuts—designing a seamless, accessible workspace that’s available anytime, anywhere.
Office 365 Installation
To work seamlessly within OneDrive and Office 365, we must first install the Office 365 suite, and then license the software using our UofL credentials.
Note: If you already have Office 365 installed, you can skip this step.
Log into UofL Webmail:
- Open your webmail and log in with your UofL credentials.
Access Microsoft 365 Installation:
- Click the 'App Launcher' (top-left corner).
Select 'Create More' from the menu, then select
Image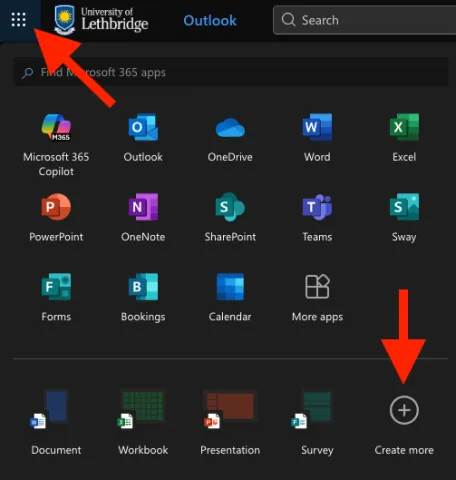
Click 'Install Apps (top right) then click 'Microsoft 365 apps'
Image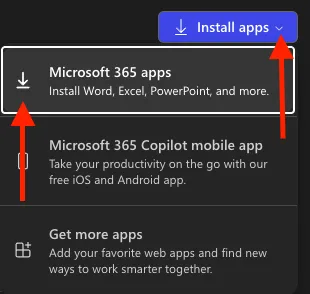
Download and Install Office 365:
Click 'Install Office', and the installer file will download to your 'Downloads' folder.
Image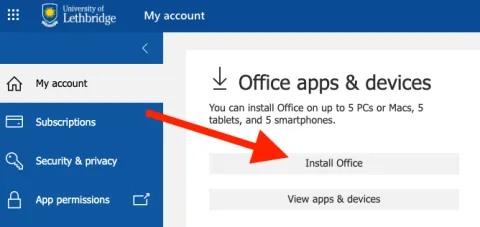
Open the downloaded file and run the installer.
Sign Into Office 365:
- When prompted, sign in using your full UofL email and password.
You’re now ready to begin working with Office 365 and OneDrive!
Installing the OneDrive Application
The next step is to install the OneDrive application to enable file syncing:
Download OneDrive:
- Visit OneDrive Application Download to download the installer.
Run the Installer:
- Locate the downloaded file in your 'Downloads' and open it.
- If prompted to access files in your Downloads folder, click 'Allow'
- If prompted to allow access to data from other apps, click 'Don’t Allow'
- Follow the prompts by clicking 'Continue', 'Continue', etc.
- Enter your computer password when prompted.
Complete Installation:
- The installation is now complete.
Logging Into the OneDrive Application
Next, we will log into the OneDrive application to enable access to our files saved in OneDrive:
Open OneDrive:
- You may have been prompted to sign into OneDrive following the previous step
- If you were not prompted, locate and open 'OneDrive' from your Applications folder.
- You may have been prompted to sign into OneDrive following the previous step
Sign In:
- Use your UofL email and password to sign in.
Set Up Folder Location:
- When prompted about your OneDrive folder location, click 'Next'
Complete Setup:
- Click 'Next' on each prompt to complete the setup.
- When prompted about syncing files, click 'OK'
- Click 'Next' on each prompt to complete the setup.
- When you reach the "Get Mobile App" screen, select 'Later'
- Click 'Open OneDrive' to complete the process.
NOTE: Your files will begin synching but will typically not show progress until the window is closed and reopened.
OneDrive: Application - Folder Creation
Open OneDrive:
- Locate and open 'OneDrive' from your Applications folder.
Create a Primary Folder:
Right-click in an empty area and select 'Create Folder'
Image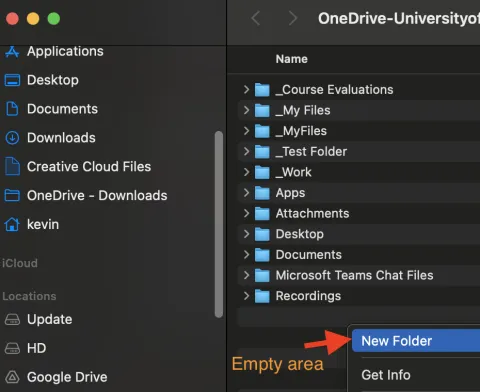
- Name this folder something indicative of your work files, such as '_My Files' or '_Work Files'
- (Note: Adding an underscore (_) at the beginning of the folder name will position the folder at the top of your files list.)
Create Subfolders:
- Double-click to open the newly created primary folder.
- Create two new folders within this folder:
- Right-click in an empty area and select 'Create Folder'
- Name them '_OneDrive Desktop' and '_OneDrive Documents'
By structuring our OneDrive in this way, we replicate our workstation's organization, facilitating easy access and management of our files. In the next step, we will begin adding files to these folders.
Upload Files to OneDrive
At this point, all your work files should still be located on your local computer. The goal is to make a copy of your entire workstation so we can work within OneDrive. However...because we are moving files from an Apple computer to a Windows-based server, file naming issues will likely occur, which if found, will prevent files/folders from being uploaded.
To ensure large groups of files and folders upload successfully, please contact Kevin Orr at kevin.orr@uleth.ca to schedule assistance.
Uploading Single Files
If you would like to upload single files to your OneDrive, please do the following.
Log Into OneDrive
- Log into OneDrive: OneDrive Login
- On the left, click 'My Files,' then open the folder you created as your root folder
- Example: '_MyFiles' or 'Work Files'
- Image
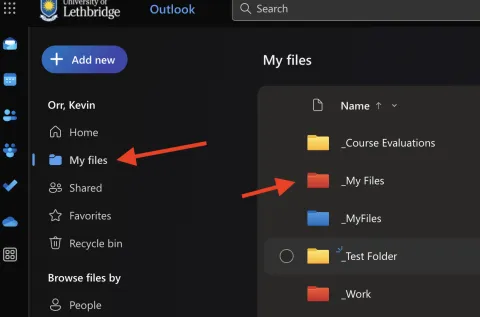
- Lastly, open '_Desktop Documents' folder
Upload Files:
Click '+ Add New ' (top left) and choose 'File Upload'
Image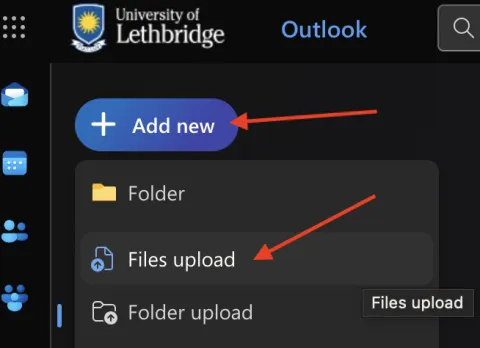
- Select the file you wish to upload, then click 'Open'
The file will upload (copy) to your OneDrive and will be accessible
Working with Files in OneDrive
With our files now accessible in OneDrive, we can effortlessly open, edit, and save files, while working directly within OneDrive.
Opening an Existing File:
Access OneDrive:
- Click the 'Finder' icon (bottom left) on your dock.
In the Finder sidebar, scroll down and select 'OneDrive'
Image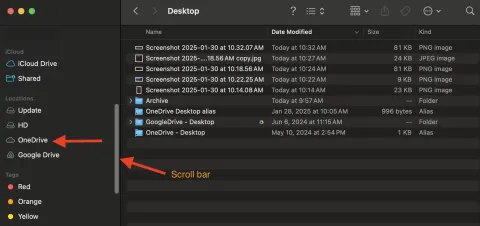
Note: If you do not see OneDrive in your sidebar, go to your applications and open OneDrive
Locate Your File:
- Open '_My Files', then navigate to '_OneDrive Desktop' or '_OneDrive Documents'
- Double-click the file you want to open/edit.
Edit and Save:
- Files will open in their appropriate local application (e.g., Word, Excel).
- Make your changes.
- Edits are saved automatically with each keystroke, thanks to OneDrive’s real-time syncing.
Creating and Saving a New File
Create and save new files directly from local applications like Word to OneDrive, ensuring seamless syncing and automatic saving.
Open an Application:
- Launch your desired application (e.g., Word, PowerPoint, Excel).
Create and Save:
- Click File > Save As.
- Save the empty file first to enable automatic syncing before you start working.
- In the save dialogue box, click 'Online Locations'
- Image

- Navigate to OneDrive - University of Lethbridge (left), then choose the appropriate folder (e.g., "_My Files," then "_OneDrive Documents" or "_OneDrive Desktop")
- Image
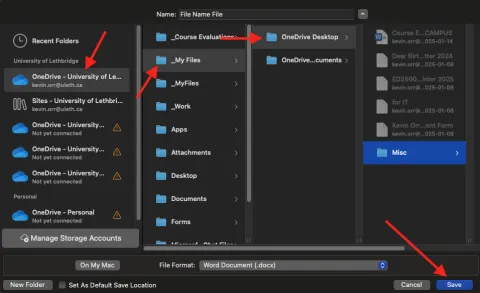
- Assign a file name and click Save.
Compose Your File:
- Begin working on your document as needed. Once saved to OneDrive, all changes are automatically synced with each keystroke. This ensures our work is securely saved and accessible from anywhere!
Creating an Alias (shortcut)
- Click 'Finder' (bottom left)
- Scroll down and click 'OneDrive'
- Open '_My Files' (or whatever you named your root folder)
- Right-click '_OneDrive Desktop' and select 'Make Alias'
- Right-click '_OneDrive Documents' and select 'Make Alias'
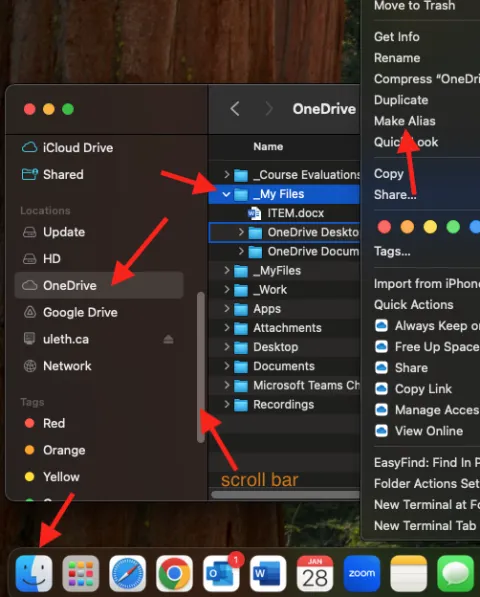
- Drag the newly created '_OneDrive Desktop alias' and drop it right onto your desktop for quick access.
- Now, whenever you want to work on files, simply open the _OneDrive Desktop alias' from your desktop
Creating Sidebar Shortcuts
Another timesaving feature is to create sidebar shortcuts. These shortcuts will be visible anytime you are in Finder (aka any time you open a folder, any folder, regardless of where it is on your computer)
- Click 'Finder' (bottom left)
- Scroll down and click 'OneDrive'
- Open '_My Files' (or whatever you named your root folder)
Scroll up to the top
Image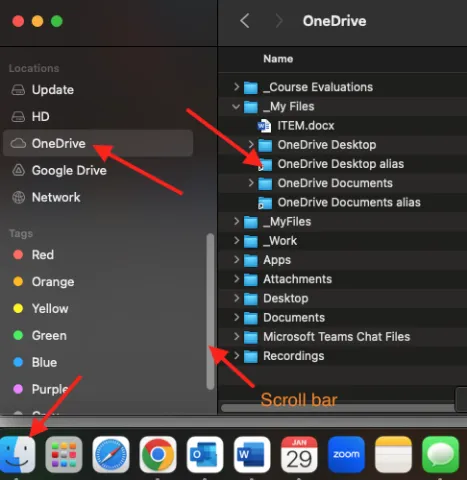
{Click+hold+drag} the '_OneDrive Desktop alias' and place it under your Favourites list
Image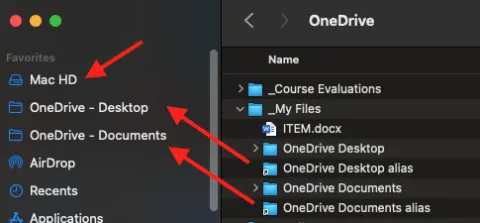
- If you make a mistake, {click+hold+drag} the alias and move it where you want it in your favourite list
Adding a shortcut to your sidebar lets you access OneDrive and all your files with a single click.
