Computing
Computational Resources at the CCH:
Step-by-Step instructions for getting connected to a remote server with ssh and VNC:
In order to gain access to the graphical display of a remote server, you will use VNC and ssh. VNC stands for 'virtual network computing' and is a way to transport the graphics from a remote computer's desktop through the network to your local computer. VNC is not particularly safe, in order to mitigate the security risk, we use ssh (secure shell) to encrypt the VNC connection and create a safe network tunnel from the remote server to your local PC. Here are the steps needed to get an ssh-tunneled connection for VNC to work:
On your local PC/Mac/Linux device, open a command line shell and generate an RSA lock/key pair:
ssh-keygen -t rsa
You can also watch this short video which explains the concepts of public/private key pairs, and demonstrates how to generate a public rsa key. The commandline shell window under Windows is called 'cmd', look for it in the search field in the lower left corner of your screen. For Macs, the terminal app can be found under Applications (a black rectangle icon). After issuing the above command, simply hit enter until you get back to the command line. Watch the screen for the location of your private/public key/lock pair, typically in C:\Users\your_user_name\.ssh).
- Attach the public lock (id_rsa.pub) file to an e-mail and send it to the system administrator.
Connect to your account on the server:
ssh your_user_name@server
where 'your_user_name' is the username assigned by the system administrator on the remote server, and 'server' is the remote computer (e.g., jane@uslims.uleth.ca, or jane@142.66.17.10).
generate a VNC password by typing at the command line from the server:
vncpasswd
Your password will not be shown, and backspace/delete keys are ignored. If you make a mistake, abort this command with 'Ctrl-C' and hit the up-arrow or retype 'vncpasswd'.
Start your VNC server:
sudo vncctl start
Note the display port for your own personal display on the remote computer. Display ports always start with the two numbers '59'. The port on this number serves the graphical desktop only for your account to a remote computer. You will connect to it using a vncviewer client. To connect, you will need to establish an ssh tunnel, through which the VNC port can be safely transmitted, ssh provides secure communications and encrypts all communications in transit, so nobody else can listen in on your connection or hack into the server. ssh access is also tightly controlled on the remote server so only authorized users can connect.
Exit the terminal connection to the server:
exit
You should now see the prompt from your local computer again.
Next, establish a secure shell tunnel to the remote server and forward your VNC display port to your local computer. The remote display port and the local display port can be different. On the local computer you are the only user, so you can use the first '59' port, for example, 5901. The command below tunnels the port through ssh and forwards it to your local computer's VNC client/viewer:
ssh -fNCL 5901:localhost:59nn your_user_name@server
where 'nn' stands for your VNC display port number. Here is what this command means: 'ssh' is the secure shell command, the program that encrypts your connection to the remote server. '-fNCL' is the command switch to ssh that tells the program to forward the vnc port 59nn from the remote server to the local port 5901 on your 'localhost' computer, i.e., your own local PC. 'your_user_name@server' tells the program to connect to your account on the server, where you have an ssh digital lock/key combination (the two files id_rsa.pub and id_rsa) that authenticates you for this server.
PLEASE NOTE: On Windows PCs the '-f' switch doesn't do anything, the Windows version cannot work in the background. That means your command will not return to the commandline until you stop the command with 'Ctrl-C'. The command appears to "hang". This is normal, as long as the command "hangs", the tunnel is open, and you can connect to the remote display by connecting to your localhost's 5901 port.
- Start your vnc viewer client and connect it to 'localhost:5901'.
There are different VNC programs available. You only need to install the VNC viewer components of these programs, unless you want to turn your own computer into a VNC server, which is typically not needed. For Windows, UltraVNC is recommended, for Linux computers Remmina is a good choice, though there are many others. Newer Macintosh computers have a VNC viewer built in, in your top menu bar, select the "Go" entry and then click on "Connect to server..." at the bottom. Enter: 'vnc://localhost:5901' in the dialog that pops up. For older Macs, you could use RealVNC, really old Macs can be made to work with Chicken of the VNC.
Obtaining an Account for the CCH Computational Resources:
The first step in accessing the CCH computational resources requires you to get a Linux account on the login node. Send a request to Borries Demeler, including your name, office number, preferred unix username, the public IP address of any computer with which you will access the server, and the public portion of a self-generated OpenSSH public/private key pair. In order to access the account, the public portion needs to get installed into the ~/.ssh/authorized_keys file of your new account. This will allow you to log into the server without a password from any computer that has the private key portion. To generate the key pair, please use the following procedure:
This works on a Linux/Mac/Windows client, and is the preferred method:
Open a terminal and generate the key pair with this command:
ssh-keygen -t rsa
This will generate a key pair in ~/.ssh, called:
~/.ssh/id_rsa
~/.ssh/id_rsa.pub
You can also watch this short video which explains the concepts of public/private key pairs, and demonstrates how to generate a public rsa key. Copy the ~/.ssh/id_rsa.pub file into an email and send it to Borries Demeler.
PLEASE NOTE: Any computer's IP address used to connect to a CCH computational resource must first be registered and exempted for access to the system. If you have a laptop that is used from different locations, please be sure to send all IP addresses used to Borries Demeler via email. If you are using your laptop from campus, your IP address is already permitted on the CCH server and no additional action should be needed. If you are on the University of Lethbridge or the University of Montana campus, your address is already exempted. If you connect from home or elsewhere, you need to send your external IPv4 address (format: xxx.xxx.xxx.xxx). If you are on the University of Lethbridge campus, your IPv4 address will start with 142.66.xxx.xxx, at the University of Montana campus your address will start with 150.131.xxx.xxx. Those three-digit numbers will be between 0-254. You can find out what your static IP is by connecting to http://whatsmyip.com.
PLEASE NOTE: Due to enhanced security requirements, you will not be able to log into your account with a password, only with a computer that has a matching public/private key pair installed. You can connect from multiple computers, but each computer needs to generate its own public/private key pair, and the public portion of the key needs to be installed in the authorized_keys file, in the .ssh directory of your home directory.
Connecting to your account on the CCH Computational Resources:
After completing the previous step, you will need to use the ssh client to connect to a text/terminal based interface to the server. The procedure for connecting differs based on the operating system. Under Linux, Mac and Windows you can use any terminal to enter the ssh command to connect to the remote server. Under older versions of Windows, which come without the Linux layer, you will need to use the putty client to establish a connection.
Linux/Mac/Windows client:
Open a terminal and issue this command:
ssh yourusername@cch.uleth.ca
Provided the keys were properly installed, this will allow you directly to connect to the remote server, without a password. If you connect for the first time, ssh will ask you to accept the security credentials on your local host. This is normal, just select the "yes" option.
If you work from an X11 GUI environment, you could at this point forward the X11 traffic directly to your local X11 server running on your local Linux host. This can be accomplished using the '-Y' switch to ssh. Adding compression with the '-C" switch will help on slower networks. An even faster approach is to tunnel your remote Linux desktop display through ssh by port-forwarding the remote VNC session to your local computer and use a local vnc viewer to display attach to the VNC session. This approach works on Linux, Windows and Mac and should be used by default. This approach is explained under Establishing a GUI connection to your account.
Older Windows clients must use putty:
Open the putty.exe program, select the "Session" option from the left bar, enter the remote username and address, and save it under a unique name:
Image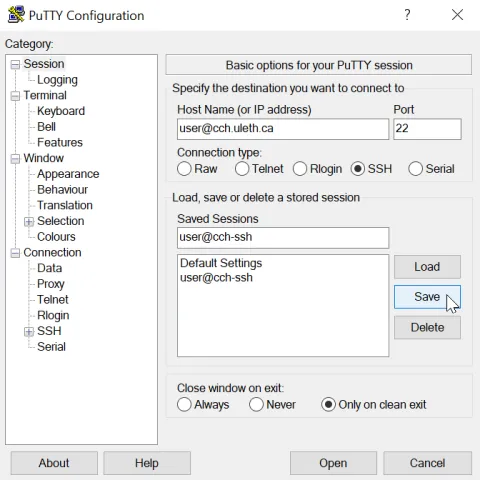
This alone will not be sufficient to connect to a resource. You will need to tell your ssh session to use your private key that matches the remote public key installed on the CCH server to identify your ssh session. For that, click on +SSH option in the left panel of putty and select the +Auth option:
Image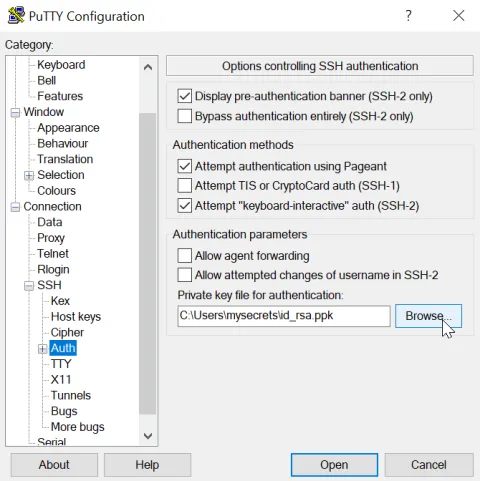
Browse to the private key location you saved earlier (generated previously in Obtaining an Account). Now that your ssh session is associated with your private key, re-save your ssh session by navigating back to Session in the left panel and click on Save once more to save your ssh session configuration changes.
Image
- Now you are ready to use your ssh connection by highlighting the previously saved session and opening it.


Connecting to your account on the CCH Computational Resources for executing graphical (GUI) programs:
Most programs you will be using on the CCH Computational Resources involve some sort of graphical interaction. This means a simple ssh connection through the terminal is not sufficient. Most networks are fast enough to support executing graphical programs remotely. After completing the ssh key setup in Obtaining an Account, you now need to tell ssh how to transfer GUI traffic over the ssh connection. The method differs depending on your operating system. The approach requires the use of ssh again, which provides authentication, a TCP/IP transport layer for other commands, and encryption of all network traffic between you and the CCH computational resource.
Linux/Mac client with X11 server:
- To transport GUI traffic from a Linux server to your local Linux host or Mac computer, you can simply tell ssh to perform X11 forwarding by adding the "-Y" switch, and adding the "-C" switch to provide additional network compression for faster service:
ssh -YC user@cch.uleth.ca
Once logged in, you can issue GUI commands directly on the remote server and the GUI applications will display on your local X11 server.
PLEASE NOTE: This may be obvious, but you must be running an X11 environment locally for this to work. Just booting into a text terminal console on your local PC is not workable, you will need to run a KDE or GNOME window manager. In addition, not all GUI programs may work correctly when used this way.
Linux/Mac/Windows client (no X11 server needed):
A slightly faster and more robust alternative, which also works on the latest Windows versions, is to use VNC (virtual network computing). The uslims.uleth.ca server has a VNC server built in, and each user on this system has their own GUI display that can be accessed via VNC. To use it, the display needs to be tunneled through a ssh connection to your local laptop or desktop. You will forward the VNC port assigned to you through ssh to your local computer and then you can connect to it from your local computer directly as if the VNC server were running on your local computer (to learn how to start a VNC session for your account please see Controlling your VNC Display). To forward your VNC port with ssh, use this approach:
ssh -fNCL
:localhost: user@cch.uleth.ca For windows, omit the "-f" switch:
ssh -NCL
:localhost: user@cch.uleth.ca Let's assume you were assigned VNC display :3 on the CCH compute resource, then you could forward it to your local VNC port 1 like this:
ssh -fNCL 5901:localhost:5903 user@cch.uleth.ca
For Windows, omit the "-f" switch:
ssh -NCL 5901:localhost:5903 user@cch.uleth.ca
Once you issue this command on your local Linux host, you will be able to connect with your own vncviewer to your local address, for example:
vncviewer :1
For newer Macintosh OSX versions, you do not need a separate VNC viewer, it comes with one built in. At the top of the screen, you see the "Go" menu entry in the menu bar. Click on that, and select: "Connect to server". In the dialog that pops up, enter:
vnc://localhost:59xx
where "xx" is your display number on the remote server (e.g., 12 in the example above).
For older Mac desktops, I recommend RealVNC Viewer.
For Windows, use the UltraVNC client to connect to the local VNC port by entering "localhost:1" for the "server:port" field:
server:port localhost:1 (then click on "Connect")
Older Windows clients without ssh/powershell built-in: (only if the method above does not work)
- On Windows, you will need to use putty to perform the port forwarding, and after establishing the ssh connection, you can connect to your remote VNC server using a local, port-forwarded connection. The first step is to open putty and create a session and configure it:
Create a connection and give it a name that makes sense to you and save it by clicking o the Save button. Next, find +SSH in the left configuration panel and navigate to +Auth and enter your private key as described in Obtaining an Account:
Image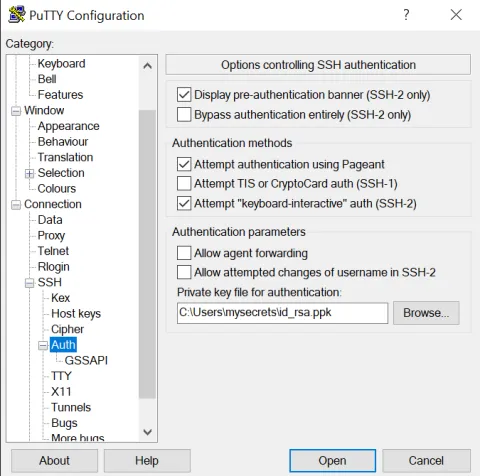
Next, you need to install the port forwarding rule for this session. Here you need to forward a remote VNC display that was assign to your user account to a local port on your system. Navigate to +SSH and Tunnels:
Image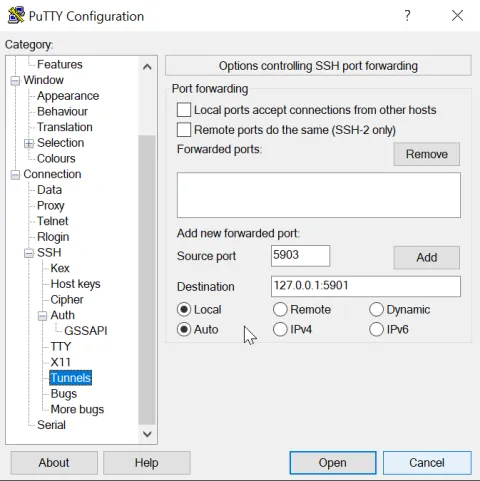
The purpose for port forwarding is that a secure channel can be used to tunnel the VNC program's commands, and then a local VNC client can be used to interpret the vnc messages into a graphical representation on the local computer. Since only vnc messages are sent, and not entire graphics, the local vncviewer would be faster than the approach in Connecting to the Account. To add a tunnel to your ssh-VNC session, enter the localhost's IP address (this is always 127.0.0.1) under Destination, followed by a ":" character and the destination port. If you aren't serving another VNC session from your local host, you could just forward to your 5901 port (all VNC ports start from port 5900, where 5900 (display :0) is your local computer's window manager, and 5901 would be display :1. The source port on the remote ssh connection would be the display number assigned to your account on the CCH compute resource. Assuming it is display :3, then the associated source port would be 5903. Enter that under Source Port and click on Add:
Image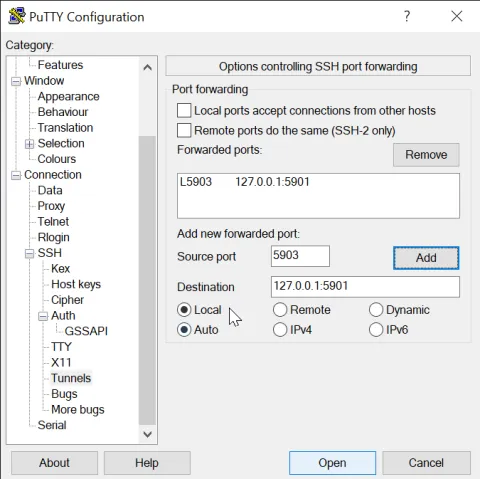
Next, you can also add compression to speed up your connection even more. Highlight the +SSH option in the left panel and check Enable Compression:
Image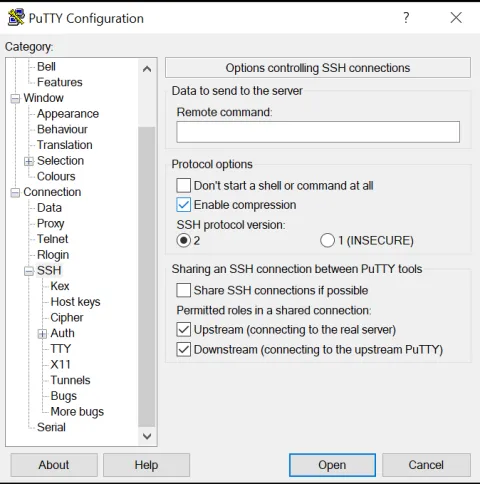
Finally, navigate back to the Session tab and save your session once more to make sure all changes are committed and saved to your session:
Image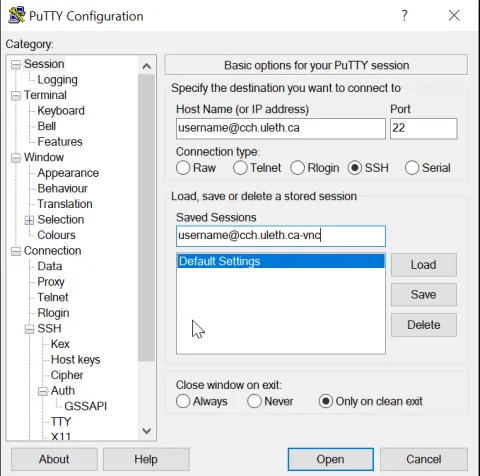
Next, open this session and connect to vnc. I recommend to use TightVNC as your client. To connect, open the TightVNC viewer and enter the local destination address:
Image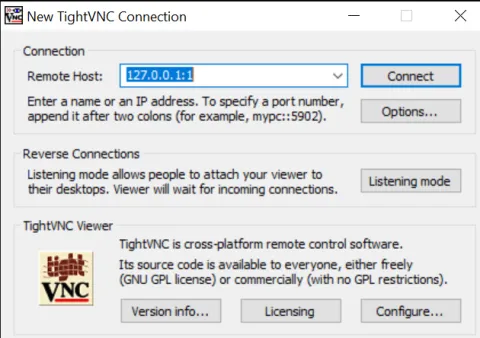


Controlling you VNC display
When you obtain an account on the CCH computer, you will be assigned a display number. Under Unix, many users can use the graphical environment, but unlike under Windows, each user can use a different virtual graphical desktop environment and use it simultaneously with other users. The different desktop environments are kept separate, which is accomplished by each user a different display number. The display number is assigned initially by the system administrator using the vncadmin command.
Usage:
/usr/sbin/vncadmin {add|info|list|remove} [user]
Once logged into the CCH resource, you will need to set up a password for your account, and for the VNC server. To set up a password, just enter the command passwd at the terminal prompt:
[user@cch ~]$ passwd
The password will not be echoed on the screen. Type it in twice, the second time for verification. Next, you need to set up a password for the VNC server. For that, use the vncpasswd command. You can reset your password anytime you like by repeating these commands. Next, start your VNC server for the first time. Once it is running, it should stay running forever, or until the machine is rebooted or the server is stopped manually, or in case you have to reset it. This is done with the vncctl command. The vncctl command is used to start, stop or restart your VNC display. It has to be run under 'sudo', and if you have been assigned a display, you can start this command. If you forget to use 'sudo' to start it, you will see an error:
/usr/bin/vncctl: must be run as a user (not root) and with a sudo prefix
Hence, use it with the sudo prefix:
sudo vncctl {status|start|restart|stop|enable|disable}
To start your VNC server for the first time, use:
sudo vncctl start
This will result in your display being started, with the following message:
vnc port for user user is :1
for ssh tunneling use numerical port 5901
Please note the display number (":1" in this case), this will be the display or port number you will need to connect. VNC ports start with "5900" for display ":0" and go up from there. Display :10 would be port 5910. Display ":0" is reserved for the console display, i.e., the monitor physically connected to the computer, and it is typically not served through VNC.
To check the status of your VNC server, use:
sudo vncctl status
To stop your VNC server, use:
sudo vncctl stop
To restart your VNC server in case it needs resetting, use:
sudo vncctl restart
Please be aware that stopping or restarting will kill all running programs in your desktop environment, and if you have anything open, you will likely loose any data that have not been saved.
Copying files to/from the CCH Computational Resources:
Here are some instructions for copying files from the server. The instructions below assume that you have already obtained access to the server and set up your ssh keys in the Obtaining an Account section.
To copy files from the Lethbridge server to your local computer, you can use the secure copy program ('scp'). This program is available on Linux, Windows and Macs and can be used from the command line by opening a terminal window first. The syntax is as follows: to copy one or more files from a single directory:
scp username@cch.uleth.ca:sourcefile destinationfile
The sourcefile can include a user account and server, for example, if you have a file called myfile.txt in your home directory on the server, you could copy it like this:
scp myusername@cch.uleth.ca:myfile.txt .
Don't forget the trailing dot, it is a shortcut for the destinationfile if you don't want to change the file's name. In this case, it just means that you copy the file into the current directory from which you are issuing the command. So 'cd' into the desired directory on your home computer first, and then issue the command from there.
If you want to copy multiple files from the computer, you can use wildcards:
scp myusername@cch.uleth.ca:myfile.* .
this would copy all files that start with 'myfile.'. Or to grab all files in a subdirectory, use:
scp myusername@cch.uleth.ca:mydir/* .
If you want to copy an entire directory and its contents recursively, you can use the '-r' flag (for example, subdirectory dir2 in dir1:
scp -r myusername@cch.uleth.ca:dir1/dir2 .
(For Windows directories use backslashes instead)
You can also use scp to copy files from your computer to the server by using the local filename for the sourcefile and the remote file for the destinationfile:
scp myfile.txt myusername@cch.uleth.ca:myfile.txt
or again, just use the trailing dot, this time without a space in between:
scp myfile.txt myusername@cch.uleth.ca:.
or using recursive mode for an entire directory:
scp -r dir myusername@cch.uleth.ca:.
Like any good utility under Linux, scp has lots of options, to get more details on the program, look up the manual page (man scp) on the server, or search google.
CCH Hardware:
- cch.uleth.ca:
- CPU: dual Epyc 7742 @ 2.9 GHZ system with 128 cores
- GPU: 3 x NVidia GV100GL [Tesla V100S PCIe 32GB]
- RAM: 512 GB
- Storage: 75TB RAID5
- Batch Processing: SLURM
(please read this documentation on how to submit processes to the batch queues for CPU and GPU, as well as for instructions on how to submit interactive jobs to the SLURM queue.)
- demeler2.uleth.ca:
- CPU: Intel i7-7820X CPU @ 3.6 GHz system with 16 cores
- RAM: 64 GB
- Storage: 8TB RAID5
- demeler3.uleth.ca:
- CPU: Intel(R) i9-7980XE CPU @ 2.6 GHz system with 36 cores
- RAM: 128 GB
- Storage: 7TB RAID5
CCH software packages:
The software on the CCH server is installed using specific software environments that can be accessed by modules. To find out what software environments can be invoked through modules issue the 'module avail' command. The following modules are currently available.
System Software
- dot
- mpi/mpich-x86_64
- module-git
- module-info
- modules
- null
- use.own
Molecular Dynamics & Modeling
- amber/20
- (AmberTools)
- fftw3/double
- fftw3/float
- gromacs/2020.5
- gromacs/2020.5-double
- gromacs/2020.5-mpi
- gromacs/2020.5-plumed
- lammps/double
- lammps/single
- namd/2.14
- namd/3.0
- openmm/7.5.0
- plumed/2.7.0
- pymol/gui
- python/anaconda3
Hydrodynamics
- ultrascan/gui
- ultrascan/gui-build
- ultrascan/mpi
- ultrascan/mpi-build